Pulling into the parking lot of Tapawingo Park in West Lafayette, Indiana the morning of September 24, 2017, my stomach was a knot of excitement and nerves. I had attended Art on the Wabash in years past, but today would be totally different. I would be stocking my very own booth with pieces that I had spent months creating and displaying them for purchase to hundreds of community members, friends, family and coworkers. A year ago I was totally unprepared for this. I hadn't owned a booth or walls and I hadn't yet created the art that would fill them. I didn't have a business card because I didn't have a business name, logo or website to display on one. In fact, at the beginning of this year all I really had was a dream deferred for far too long and a calling to create which was becoming painful to ignore. Today I had a registered business, a tax ID, a website, a logo, a sign, business cards, a booth with walls and the art pieces to fill them. At the beginning of this day I had little idea what to expect or how my work would be received and at the end of this day I would go home with the 2017 People's Choice Award and would watch myself being interviewed on the local nightly news. This is how I prepared for my first art fair and what I learned along the way.
Disclaimer: As an Amazon Associate I earn from qualifying purchases. These are products I use myself and would recommend regardless. There is no extra charge for purchasing through the link. I just want to share what I actually use and make it easy for you to find!

Setting my intentions and how I prepared to apply
The first and most important steps for me were to get rid of my excuses and put a muzzle on my self-doubt. Believing you have something worthwhile to offer goes a long way and once you decide you're ready to put yourself out there, it's time to figure out what's getting in your way. For me, this meant switching my hours as a medical technologist from full-time to part-time. It was a scary decision for our family, and it wasn't without sacrifice, but in the end it was a game changer. I realize this isn't a practical solution for everyone, but the bottom line is scheduling time for yourself is just as important as the time you give to everyone else!
Once I had a little time on my hands, I needed to set a goal. Ultimately I wanted to create and share my art with others and eventually earn some income from my work. I was aware of Art on the Wabash and knew that it was an event which was only open to local artists. It is a juried art fair that is well attended and there is a wide variety of styles and media represented. To show at the event, I would need to create and photograph eight pieces for submission with my application in May. This gave me about five months to explore ideas and experiment with techniques.
In the next few months, I created a lot of interesting pieces, but began to realize they were a hodgepodge of ideas and media without a clear direction. Fortunately, my husband knew a local artist with a gallery in town who was willing to meet with me and give me some feedback. She singled out the wet felted wall hangings and vessels and suggested I focus on this style for my application photos and show. Since I absolutely love working with wool, I was in total agreement and that's exactly what I did. She was also able to give me some feedback in terms of the strengths and weaknesses in my art. For someone like me, with little to no formal art education it was extremely helpful to say the least. It enabled me to elevate the pieces I had and improved my direction for works to come.
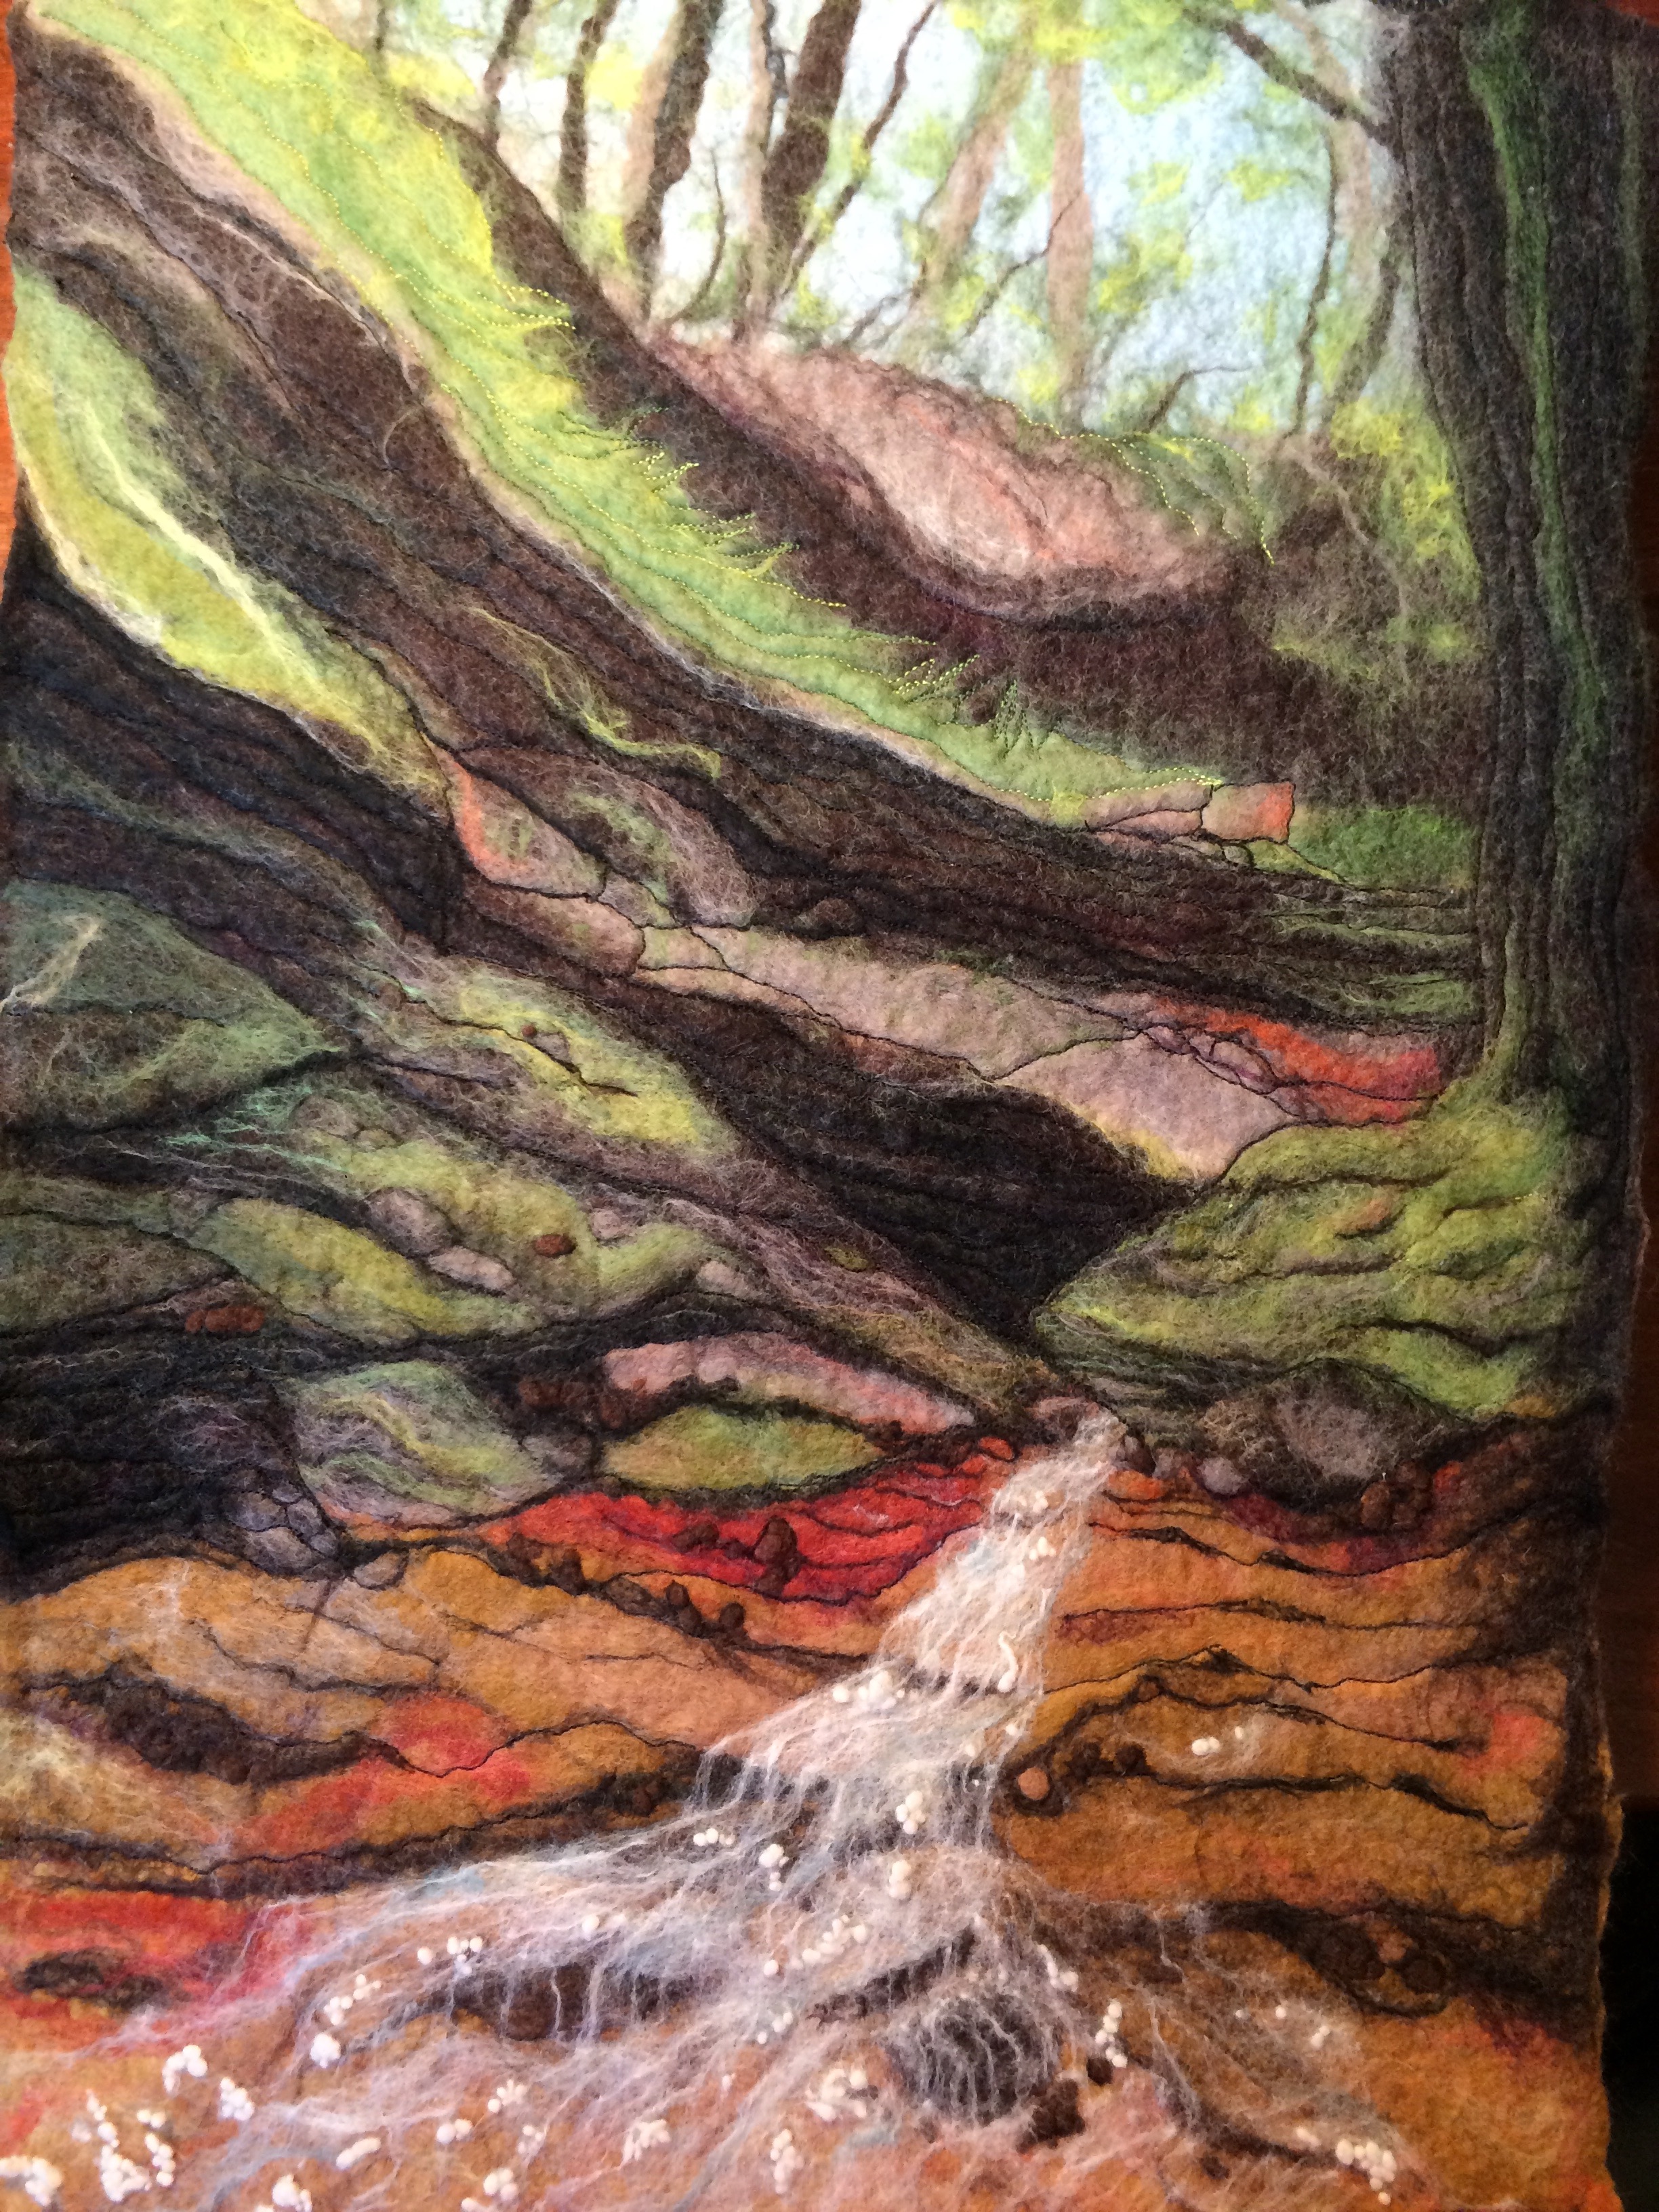
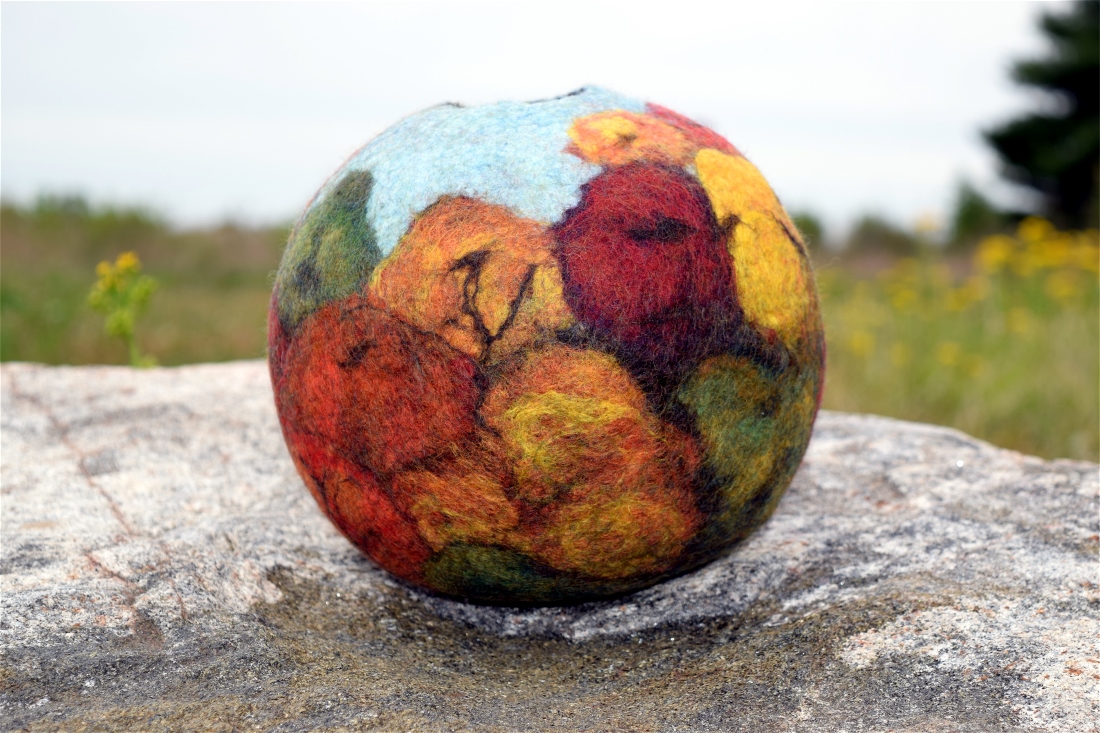
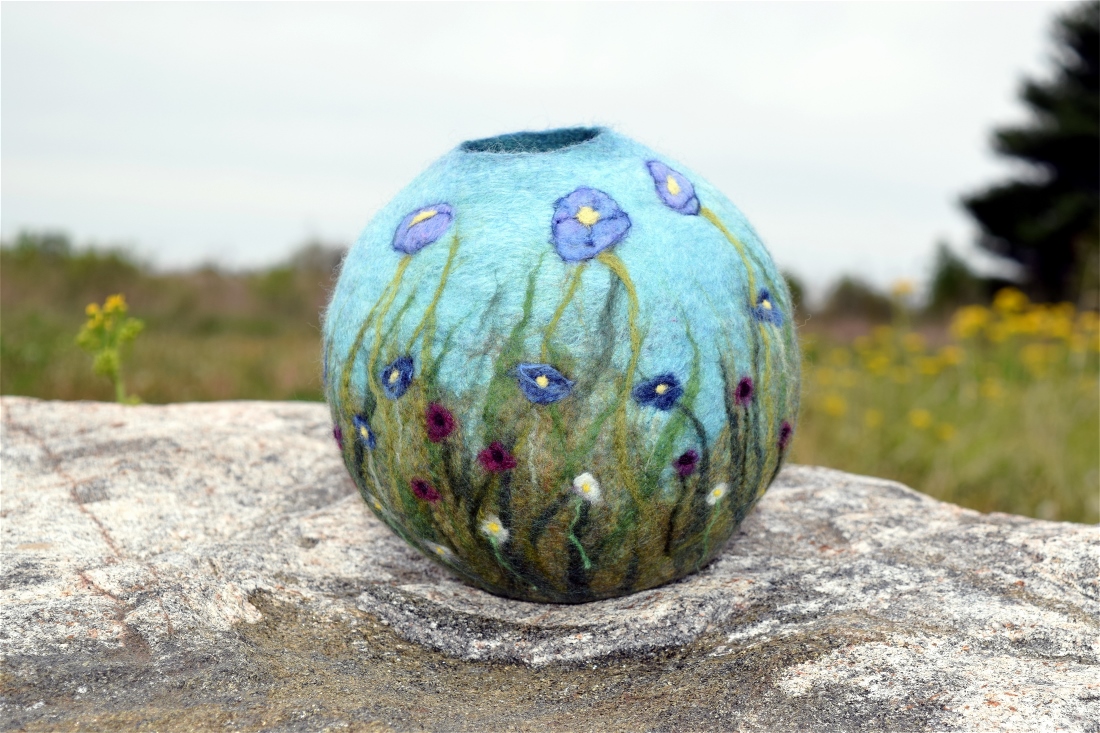
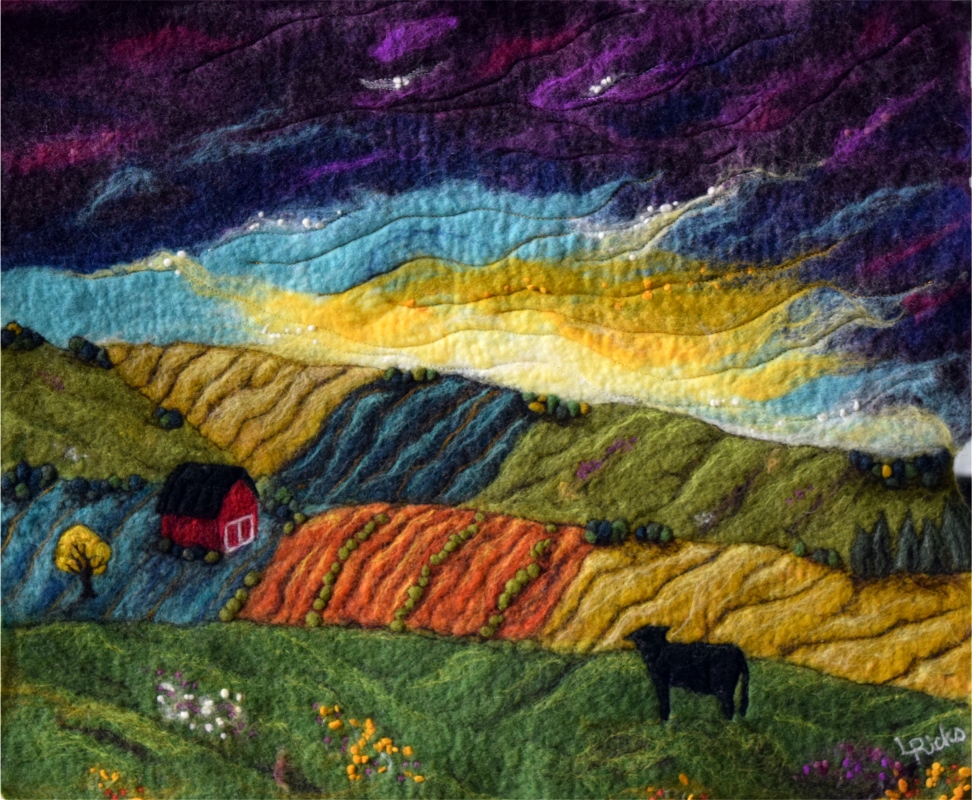
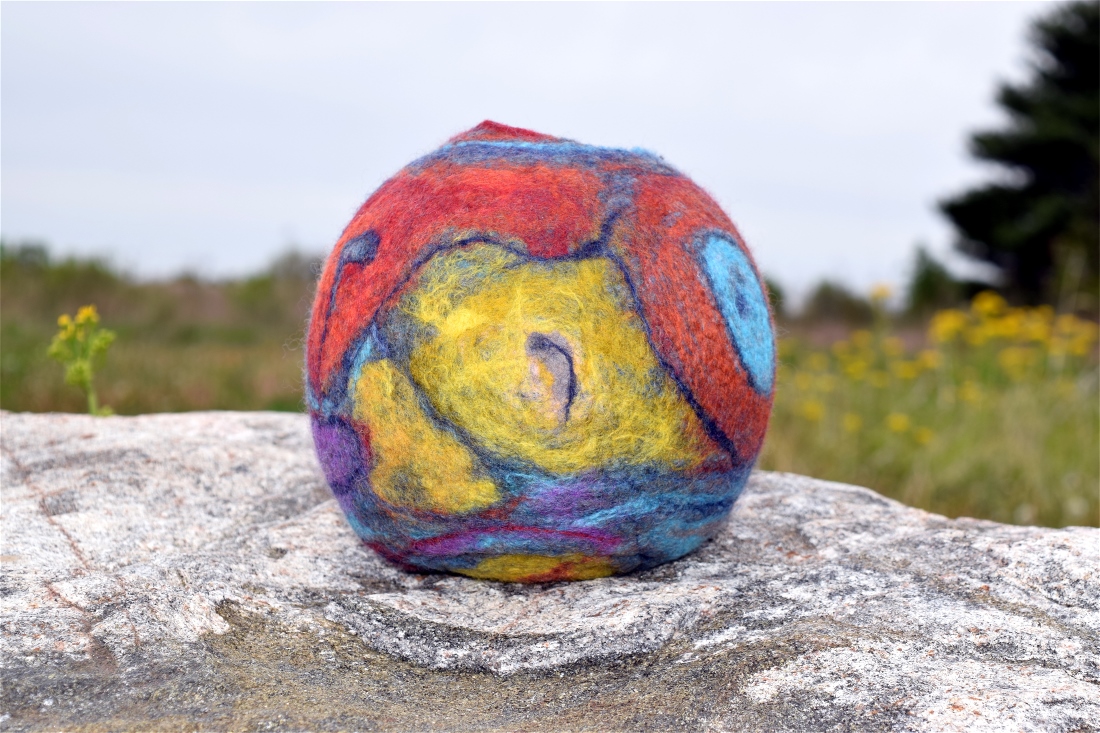
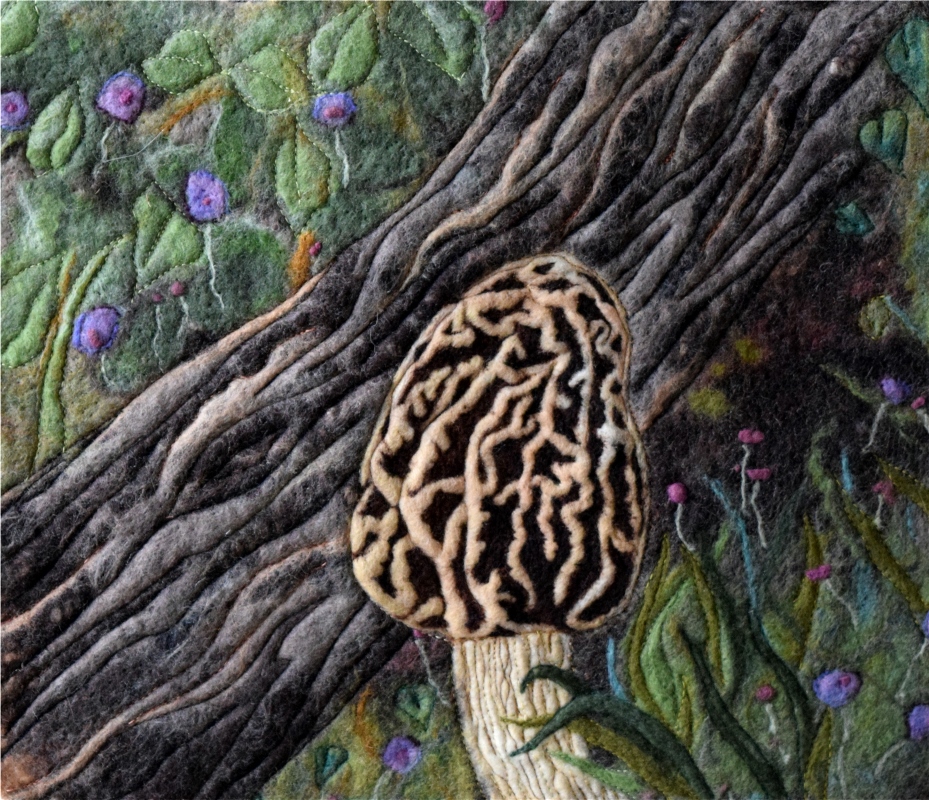
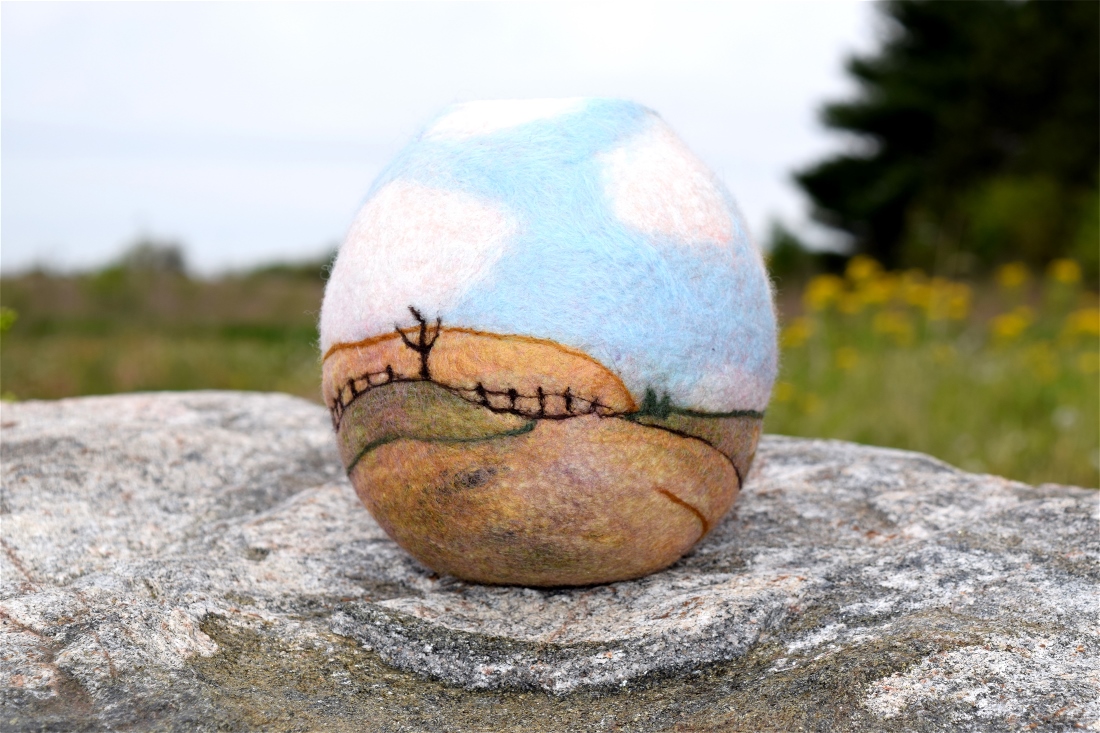
Once my works were completed, I needed a way to photograph them for submission. Borrowing a camera from a family member or friend for this would have been the most cost-effective solution, but for our family it seemed like a good reason to finally invest in a proper camera. Ultimately I purchased a Nikon D5300 . I like that I was able to capture high quality NEF RAW images of my pieces before selling them and I also really enjoy the Wi-Fi capabilities of this camera. Being able to pull up camera images on my phone or computer through Wi-Fi is great. In the end, I submitted four images of wet felted wall art and four images of wet felted vessels. Here are a couple of the images I submitted.
UPDATE 2023: I still love this camera and the quality of the images.

On May 4, 2017, I turned in my application and images along with the required Artist's Statement and Artist's Biography, just one day before the deadline. I delivered them to the office by hand and decided to continue preparing for the show as if I had already been accepted. On May 26th I was informed that I would be able to participate!
Preparing for the event once my application was accepted
The first thing I did was begin to make a list of what I hoped to produce over the next four months to fill my booth. I decided to shoot for 20 to 25 wet felted landscape pieces of wall art and 10 to 15 wet felted vessels. In addition, I wanted to have some small pieces such as ornaments or little items for desks or small areas. I wanted to focus on what I knew and not experiment too much. My goal was to have a wide variety of price points in my booth. About 3/4 of my time preparing for the show over the next four months was dedicated to creating my inventory.
I also made a list of other goals. Most of the items on this list were related to launching a business, processing payments and what I wanted my setup to look like. These items accounted for the rest of the time I had to dedicate to my preparations and were definitely a learning experience.
First of all, I needed to decide if I was going to purchase a booth or rent one from the event organizers who kindly offered booth rental for $40. Because I'm someone who likes to feel ultra-prepared and practiced, I felt it was best to purchase a booth. I knew I would want to be able to rehearse my set up at home prior to the event and practice staging my display exactly how I wanted it. I also knew that my desire to participate in events like this would not be fleeting. Of course this was a very large investment which could have been managed through more budget-friendly means but I decided I could always resell the items if necessary. I purchased a pop-up tent with mesh panels from Flourish Displays. (I have no affiliation with this company. I’m just letting you know what I chose and how to find it.)
UPDATE 2023: I’m still using this tent and walls. In the years since I have also added a French wall and fabric covers to my booth.
Once I had my goals set for my business, it was time to think of a name and create a logo for my website and business cards. I chose a name that was meaningful to our family. The land our home is built on used to be part of Emerald Hill Sod Farm, a business owned by my husband's grandparents. I liked the name and my birth stone is the emerald so it all seemed to go together. Once I had the name chosen, I had the logo designed around it.
(UPDATE: I wish I had chosen for my name to be the focus here. In the beginning I couldn’t imagine a day when anyone ever would search for my name but now they do and most of my sites and emails start with Emerald Hill Textiles instead of Laura Ricks.)
Now that I finally had a name for my business, it was time to register it with the state. Indiana has a relatively easy government site that walked me through registering my business and getting my tax ID. The whole process may have taken a few hours total and was all able to be done online.
With all of these pieces in place, it was time to tackle setting up a website. This took up most of my time on the business end of things. I researched web hosting sites and fees and decided on SquareSpace. I chose this platform based on reviews that suggested it was popular among artists and friendly for those with little coding knowledge (which was definitely me). I also knew it had capabilities for blogs and commerce. I started with the free trial and went from there. The largest learning curve on this for me was learning how to make my images web-friendly and the importance of having them fully edited prior to loading them to the site so as not to bog down loading times. I used the free site ipiccy.com for a lot of my resizing and editing. There are plenty of videos available through SquareSpace with information on these topics which I found very helpful and easy to refer to. At this point I have yet to dive into setting up an online shop. In the months leading up to the event I knew I needed to take the pieces I was creating with me to the show. Now that the event is over, I'm working on building my inventory back up, but I do hope to look at this portion of my site relatively soon.
Since I now had a business name, website, email address and logo I was also able to order business cards. I went with a relatively inexpensive set from Staples. I assume that in the next year or so I will have additional information to add to them so I didn't need to start too fancy. The card I chose was two-sided and simply contained my basic business information.
UPDATE 2023: My cards have changed quite a bit and I’ve added information to them through the years. I bought my last batch through VistaPrint. If you’re just starting out I’d recommend not buying the largest quantity. I still have leftovers of these and don’t know what to do with them!

One other very important step I had to take was acquiring a Square reader. This was also a pretty simple online process. Once I ordered it and opened my account, it was just a matter of running through a practice payment and practice refund on my device. I also took the time to load all the items I had for sale into the reader to make checkout easier and made sure my settings were configured to automatically add sales tax.
One week before the show I turned all of my attention to finishing touches and experimenting with booth setup. I purchased merchandise bags in various sizes and made sure each bag received a sticker I had made by printing my business information and logo on a mailing label. I also made sure I had brown craft paper to wrap larger pieces in. I purchased a locking cash box for around $15 and then stocked it with about $300 worth of cash in different denominations for change. For coins I just filled the bins using the change jar in the laundry room. I also printed all of the price tags for my art onto white cardstock with a metallic gray backing to trim out each sign.
UPDATE 2023: I still have a variety of bags and sizes but love this great big merchandise bags because it’s great for my larger pieces, even when wrapped with bubble wrap. I don’t bother putting stickers on my bags anymore because I attach a business card to the back of all of my artwork. I also don’t need anywhere near $300 in cash at my shows. Most folks don’t carry cash these days but I try to have a few of each bill and coin available if needed for change.

Additionally, I spent a lot of time on finishing touches and framing in my final week of preparations. I sincerely wish that I had taken each piece all the way through the completed framing process as it was made instead of waiting until the end. I had started the framing process on most of my work, but many pieces still needed hangers added or mats cut or backing added. Making sure all of these details were taken care of took more time than I had anticipated and definitely caused me some stress in the end, but I did manage to get everything done with time to practice my booth setup!
How I decided to set up my booth
Two days prior to the event, we practiced booth building. My husband and I had put everything together one time when everything had arrived, but our kids were going to be attending Art on the Wabash and were ready to learn the process so they could help out. We were only going to have about an hour or so to get everything together that morning so I needed it to go as seamlessly as possible! We left the booth up in the yard overnight and then staged it the next day. The walls I had purchased use S-hooks for hanging and they were easy to insert and reposition as needed. Along the back wall I placed a table with small items and a photo book I had created last minute which was a detailed explanation of how I create my wall art pieces with images of each step. I was so glad I had it the day of the show! One of the first things most people ask me is, "How do you make these?" and being able to reference the pictures step by step was so handy and made it easier for people to understand and appreciate the work goes into my art. Behind the photo book I filled little jars with some of the materials I used and labeled each one. This was also very helpful because people who had more questions could see what the materials looked like before they were felted together. I also placed a large garden rack along the back wall to display my vessels and hide the open door in the back of my booth.

The other two walls of my booth were left as open as possible. I wanted people to be able to easily approach the art and see the details in each piece. I used three large easels to display my heaviest art pieces and also the sign I had made for the booth.
Once I was happy with the setup, I used duct tape on my walls to mark all the spots where I had my S-hooks and wrote which item was supposed to hang there. I also took pictures to refer to. This saved us a lot of time the next morning and I was so glad I took the time to do it! As we took the booth apart we placed everything directly into our vehicle so we were packed and ready to go.
UPDATE 2023: Booth setup looks a lot different these days. We have the flow down and don’t do practice runs anymore but it’s probably a good idea if you’re just starting out. It gave me a lot of piece of mind. I also don’t do the little jars of materials anymore. However, the photo book is still an absolute life saver! I made mine through the CVS Photo app and had it printed that day!
Art on the Wabash 2017
We woke up bright and early the next morning and arrived to the event about half an hour early to wait for our load in time. Also, having my family by my side that morning helping me out really put me at ease. They had seen me give this my all for months now and today they were going to see it all come together. I was determined to show them a positive attitude no matter how the day went.

Ready to go!
How it went
The first item I sold was a small 4" x 4" Indiana right at the 10 am opening. For some reason it made me happy that it wasn't sold to a friend of family member and it was a huge relief to have just one sale under my belt! Once people began to arrive there was an incredibly steady stream of traffic for most of the day. I did not have time to sit down or eat until after the event was over, but I drank plenty of water throughout the day and pretty much only ventured out of the booth for restroom breaks. I was so busy and excited that I never noticed being hungry and my stomach didn't growl until the moment I got in my car to leave!
I saw plenty of familiar faces throughout the day which was fantastic. I am so lucky to have family, friends a work family who care enough to come out and see what I'd been working so hard on. I also talked to a lot of friendly new faces throughout the day and saw a lot of smiles coming in and out of my booth. Whether or not people made a purchase, I was really just hoping to see that people could at least appreciate what I had done. A lot of people looked through the book on my process and seemed truly impressed by the finished products.
One of the greatest conclusions I came to throughout the day is that my community is amazing! Everyone I talked to throughout the day was so incredibly kind, helpful, curious, friendly and engaging and I quickly was able to let go of my apprehension and just enjoy the day. It was such a wonderful jumping off point for me and right now I'm busy trying to get my feet into all the doors it opened without overextending myself! More to come on where those open doors are leading!
What worked and what needs work
People loved the scenes and subject matter of the wall art. It was easy for them to relate to and it was a unique medium many people hadn't seen before. Throughout my booth I had varied framing styles. Some items were framed behind glass, some were framed with no glass to let the the textures shine, and some were wrapped around canvases. Items placed in a frame sold much better than items wrapped around canvas. All of the items in my "State Pride" category which were framed were also sold. It was hard to tell if framing with glass was better than framing without. Both sold well and it may just come down to the personal preference of the buyer. In the future I think I will try to place as much behind museum glass as I can. I was worried about the cost increase this would bring to my art but after having such a successful showing, I think I can increase my prices a touch to account for the expense.
Items like my wet felted vessels would have done better being staged with example of how to use them. This was something that I had definitely considered, but in the end I thought to myself that no one needs an explanation for what to do with a wall decoration, so why would a shelf decoration be different? This was a little short-sighted of me. I think most could appreciate their beauty, but because they are vessels they really needed an example of something to put inside them! In the end I got a lot of questions throughout the day about what to do with them. A better display would have gone a long way to help with this. However, they did get a lot of attention and were a conversation starter which is never a bad thing!
UPDATE 2023: I no longer make vessels and only use museum quality glass or acrylic when a glaze is used. I find that most people prefer to have the larger pieces of art covered with some type of glass because they worry about keeping the artwork clean. The exception seems to be smaller pieces at lower price-points. I now create 6” to 7” square pieces framed in simple 9”x9” frames. I remove the cheap glass so there isn’t a glare and am able to price these in a way where people feel like they’re buying the art and not paying so much for the frame. There’s an entire post about these simple frames if you want to check it out.
The People's Choice Award
At around 3:00, West Lafayette Mayor John Dennis took the stage to present the Suzie Coles People's Choice Award sponsored by KtichenArt. I was trying to listen as I did business in my booth and applauded along with everyone else as they thanked all of the wonderful sponsors, event organizers and volunteers. When I heard my name called as the award recipient I was absolutely shocked, and when Mayor Dennis asked me to say something I definitely got a little emotional as I tried to process what was happening. I had shown up this morning just hoping to see some smiles and hopefully sell some of my art and this had been completely off my radar. I was trying not to cry but this day had been such a long time coming. I had spent years feeling like I was supposed to be doing more than working in a lab and feeling like I had something to offer that was somehow going to waste and it felt like my whole community was saying, "Yes, this is where you're supposed to be." I was completely overwhelmed. I stumbled through a thank you and headed back to my booth for a photo of my ribbon with Mayor John Dennis and KitchenArt owner Larry Oates. To top it off, I was interviewed by the Purdue Exponent and was visited by our local state representative Sheila Klinker, who purchased some of my Indiana themed items!
Final Thoughts
My family is amazing! My children and husband were so incredibly supportive and understanding throughout this entire process. I've run errands during a few gymnastics and ninja practices instead of staying to watch and missed a couple of cross country meets and watching my daughter cheer at a football game or two. I've dragged my family around stores for hours shopping for frames or thread or fabric and my husband has picked up my slack around the house. On nights that I've been holed up in my work room, my family has come and kept me company and watched me work and given hugs when I've felt defeated. They carried me and held my hand down this crazy road and they've never made me feel like a terrible mom or wife for finally trying to chase this dream. I couldn't be luckier to have them.
Lastly I just have to say that if there's something you've been wanting to try and it just won't stop pulling on your heart, then there's a reason for that. Stop making excuses and start making time for whatever it is you're dreaming about. It doesn't matter if you don't know how to do everything right now. Set your goals and start working toward them. If you're feeling a call to action then the right path will find you as much as you'll find it, but nothing can happen until you start taking some steps. I can hardly believe all the knowledge I've gained in the past year and I know it's all just a drop in the bucket because I am definitely still trying to figure it all out. However, I feel like I'm finally walking down the right path and that's a really great feeling!
UPDATE 2023: Truer words were never spoken and this is a path I haven’t stopped walking. I’ve had pieces in museum exhibits, done solo exhibits, been a gallery member and have partnered with feltingtutorials.com to create several online classes! I’ve come a long way since all of this started but just getting started was the most important step!